AUTODERM API Guide
AI dermatology app in 100 lines of code
Written by Ricardo Ander-Egg
AI dermatology app in 100 lines of code
Deep learning has already began to show its potential across the world. This is especially true in Dermatology as AI proves to be increasingly accurate in detecting skin diseases. At First Derm we committed to the goal of making accurate AI a reality for dermatologists, pharmacies, medical professionals and the general public.
We utilised our resources as an online dermatology platform to create the most accurate, comprehensive and easy-to-use tool available on the market. That is why we created the AI dermatology API. This tool accurately detects the 43 most common skin diseases including all forms of skin cancer and visual STDs. We believe this to be a great tool for anyone working within skincare and the wider healthcare industry. It works as either a triage tool, a service for their end user, or a way to generate valuable leads.
In this post we will demonstrate how to create a fully functional web application, including a backend to interact with it. The best part is that it will take us less than 100 lines of code!
The frontend (part 1)
For the frontend we are going to create 2 different html files. The code shown here can be easily written using React, Vue or any frontend framework.
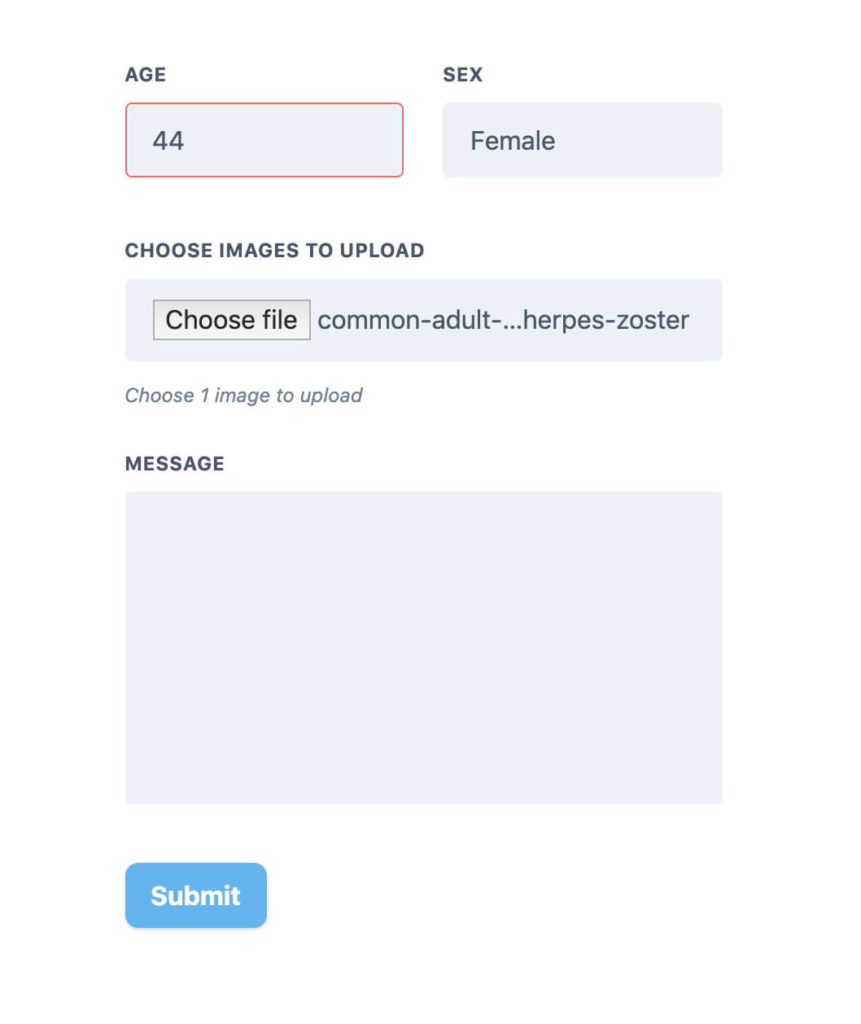
First, we need to create an index.html with a very simple form. Here are the parts needed for the form.
<form method="post" enctype="multipart/form-data" action="/img">
  <div>
    <div>
      <label for="sex">
        Age
      </label>
      <input id="age" name="age" type="number" required />
    </div>
    <div>
      <label for="sex">
        Sex
      </label>
      <select id="sex" name="sex" required>
        <option value="female">Male</option>
        <option value="male" selected>Female</option>
      </select>
    </div>
  </div>
  <div>
    <div>
      <label for="image_uploads">
        Choose images to upload
      </label>
      <input type="file" id="image_uploads" name="image_uploads" accept="image/*" required />
    </div>
  </div>
  <div>
    <div>
      <button type="submit" name="submit">
        Submit
      </button>
    </div>
  </div>
</form>
There are a couple of important things here:
First, note the line: <form method="post" enctype="multipart/form-data" action="/img"> the action="/img" this part should be the endpoint where the form data is uploaded. Now we need to create our own backend. Let’s say out main page is at http://localhost. The form data would be uploaded to http://localhost/img.
Take into account that in order to use the API you need to set the API key as a request header. That’s why we are also building our backend. If you call the API directly from your website, your users may be able to get your API key and use it on their own. It’s recommended that you first get the image in your own backend. After that you can make a request to our API using all the appropriate settings. Without the risk of leaking sensitive information (like the API key).
Moving forward in our form. You can see we are also adding a few fields: age, sex, image file and a message. Our API operates perfectly using only the image, but these extra values may be useful for leads and information.
Note down the tag attributes name in each input. We will use those in our backend.
The backend
For the backend we will use FastAPI. A developer-friendly and blazing fast python framework to create backend services.
Here is the full app, fully functional with only 43 lines of code. We’ll now go through it.
from fastapi import FastAPI, Form, UploadFile, Request  # , WebSocket
from fastapi.templating import Jinja2Templates
import requests
import os

templates = Jinja2Templates(directory=".")

headers = {"Api-Key": os.getenv("API_KEY")}

app = FastAPI()

@app.get("/")
async def index(request: Request):
    return templates.TemplateResponse("index.html", {"request": request})


@app.post("/img/")
async def process(
    *,
    age: int = Form(...),
    sex: str = Form(...),
    image_uploads: UploadFile = Form(...),
    request: Request,
):

    image_contents = await image_uploads.read()
    received_file = {"Image": image_contents}

    response = requests.post(
        os.getenv("API_URL", "https://autoderm-api.firstderm.com/Query"),
        headers=headers,
        files=received_file,
        data={"AgeYears": age, "Sex": sex, "Language": "EN", "Model": "43PLUS_noo_v3"},
    )

    data = response.json()

    predictions = data["predictions"]

    return templates.TemplateResponse(
        "prediction.html", {"request": request, "predictions": predictions}
    )
After import the necessary libraries, we set up a couple of configuration variables:
templates = Jinja2Templates(directory=".")

headers = {"Api-Key": os.getenv("API_KEY")}templates: Tells our app we are out html files. In this case we are also using FastAPI to render the frontend.headers: A dictionary to set request headers. We useos.getenv("API_KEY")in order to read our API key from the environment. Including it directly in the code is not good practice. We recommend following the 12 factor app rules. If your are using bash you can use:export API_KEY=<your_api_key>in order to have it available as an environment variable.
After that we create our app and a base endpoint to render the index.html we built before:
app = FastAPI()

@app.get("/")
async def index(request: Request):
    return templates.TemplateResponse("index.html", {"request": request})
Lastly, the most important part. The image processing endpoint:
@app.post("/img/")
async def process(
    *,
    age: int = Form(...),
    sex: str = Form(...),
    image_uploads: UploadFile = Form(...),
    request: Request,
):
Our endpoint has to accept form data. Do you remember the tag attributes name in each input of our html? Here our parameters must have the same name. That’s how the website will send them
.
image_contents = await image_uploads.read()
received_file = {"Image": image_contents}
Read the image data. Then we create a dictionary with the key “Image” and the contents of our image (bytes) as value. We need to set up a couple of things. Our API expects form data too, not JSON. Using the requests library in python, we can build our request like that:
response = requests.post(
    os.getenv("API_URL", "https://autoderm-api.firstderm.com/Query"),
    headers=headers,
    files=received_file,
    data={"AgeYears": age, "Sex": sex, "Language": "EN", "Model": "43PLUS_noo_v3"},
)
In the line os.getenv("API_URL", "https://autoderm-api.firstderm.com/Query") we are doing the same as we did with our API key. But now we are setting a default value (the current API url). If there is no API_URL variable set up, it will fallback to the default (https://autoderm-api.firstderm.com/Query).
To finish the backend, we make a request to our API and gather the results.
data = response.json()
predictions = data["predictions"]
return templates.TemplateResponse(
"prediction.html", {"request": request, "predictions": predictions}
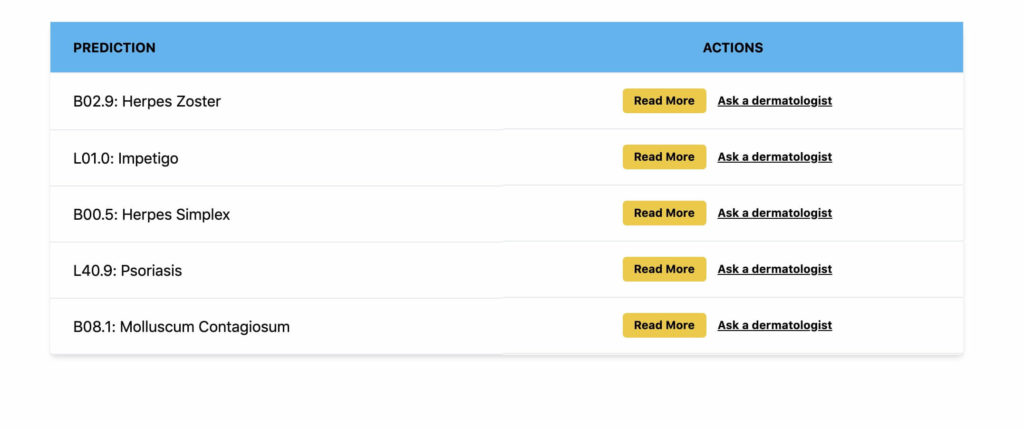
)Our API returns an array of the top results. Each element of that array looks like this:
{
    "confidence": 0.5864430665969849,
    "icd": "B02.9",
    "name": "B02.9: Herpes Zoster",
    "classificationId": "3e4f9cbe-d4aa-11e7-a562-0242ac120003",
    "readMoreUrl": "https://firstderm.com/herpes-zoster-shingles/",
}
Frontend (part 2)
Now, we have received our results from the API. We can now create a different template to render the results. Remember we are using Jinja2, that’s why there are some expressions with {}. But you can do the same in any JavaScript framework by predictions.map(pred => ...). Something equivalent to this can be done in any framework you use to develop your app.
To render the results as a table:
<table>
  <thead>
    <tr>
      <th>
        Prediction
      </th>
      <th>
        Actions
      </th>
    </tr>
  </thead>
  <tbody>
    {% for prediction in predictions %}
    <tr>
      <td>
        {{ prediction["name"] }}
      </td>
      <td>
        <div>
          <a href="{{ prediction['readMoreUrl'] }}">Read More</a>
          <a href="https://firstderm.com/ask-online-dermatologist/">Ask a dermatologist</a>
        </div>
      </td>
    </tr>
    {% endfor %}
  </tbody>
</table>
In the code above we are looping over the predictions list/array. By indexing on prediction, when we do prediction["name"]. We are getting that value from the dictionary we saw before.
Important things to have in mind
- The data has to be sent as a form of data to our API. Here it was done with Python, but it can be done in any language or framework you use.
- Keep the API key safe.
- You can process or acquire the image however you want. We acquiring the image from an html form, but you could be getting it from a JSON API, just remember to send it to us as a form of data afterwards.
- Set the API key in your request headers with the name “Api-Key”: <your_key>
Conclusion
After removing blank lines. Both html files and the python app together add up to 98 lines of code. Of course, we have ignored a bit of boilerplate code, and we have not added any styles to our app. You can see the complete app, with all the code and some CSS styles on GitHub. This is how it looks:
- Input form
- Results
In times of Covid-19, telemedicine is becoming a must. Utilising an AI tool such as ours will speed up your tele-health service, provide a solution to your client base and act as a triage tool to make life easier and more efficient for your medical professionals. Check out our API and integrate it into your platform!